know-how

Putting Some Smarts Into File Names

Using smart file names can be a key for successful digital asset management. Some users prefer to include dates in file names. Other users include project codes or use a globally unique file naming schema. Whatever naming schema you decide to use, IMatch has tools to make the job easier.

IMatch includes a powerful tool named Renamer. With it you cannot only rename files in smart ways, but also copy and move files, add folders on-the-fly, create automatic backups, and more…

The Problem

Cameras often use file names like _DSC12345.jpg, which are not really informative or useful. You cannot tell anything about the contents of the file by just looking at the file name. And, if you use more than one camera, you may even end up with duplicate file names. And that’s never a good idea.

Although the physical file name is not that important anymore when you use a Digital Asset Management (DAM) system like IMatch. But it’s always better to be able to work with your files properly outside of your DAM, e.g. when you upload files to your web site or send them out to clients or a printing service.

The Solution

The IMatch Renamer tool enables you to create consistent and descriptive file names – automatically, when new files are indexed by your database, or later at any time. Whether you use simple numerical file names or you include additional information like date and time, a project code or even metadata like title or job id is up to you.

Some Examples For File Naming Conventions

_DSC12345.ext This is the file name format used by most digital cameras today. Each image file gets a sequential number and the prefix DSC (Digital Still Camera). A leading underscore is added if the file is in the Adobe RGB color space.
2015-08-01_12345.ext This file name consists of the year-month-day the image was taken, plus a sequential number. This format is pretty common because the file names are not only descriptive but also ensure that the images are sorted by date in software like Windows Explorer.
P8781-00121.ext
P8781-20150801-00121.ext
A file naming schema which uses a project code (P8781) and then a 5-digit sequential number which identifies each file in that project. The second variant also includes the date and time.

The Renamer has a special project code feature which prompts you to input a project code automatically.

20150801-usa-new-↵
york-890.ext
A file name which consists of a date stamp, the country and city name where the image was taken and a sequential number. File names like this are great when you travel a lot.

The Renamer can construct such file names from the location metadata in the image automatically.

Project_Location_Lab_Cond_↵
20150801100501_001.ext
A file name how it is often used for files created in research projects. Each file name contains important information about the object(s) shown in the image.

The Renamer can construct such file names automatically by accessing both metadata stored in a file and global variables, e.g., the project name or the location and lab data.

Your naming convention make be based on one of these examples, or you create your own unique way of naming files. The Renamer in IMatch is flexible enough to handle (almost) everything you can come up with.

The IMatch Renamer

To rename files, select them in a File Window and then bring up the Renamer by pressing <Ctrl>+<F2>. The Renamer has a comfortable user interface which allows you to produce file names by adding one or more steps. There are steps to:

[list_font icon=”check-square-o” list_item_1=”add date and time in various formats” list_item_2=”add plain text and IMatch variables” list_item_3=”converting the case of file names” list_item_4=”including selected parts of the original file name” list_item_5=”replacing or delete text” list_item_6=”removing (leading/trailing) digits” list_item_7=”adding unique or sequential numbers” list_item_8=”copying and moving files” list_item_9=”creating folders on-the-fly, even with names based on variables” list_item_10=”prompting the user to enter a project code when he renames files” list_item_11=”…”]

While you add or change steps, the embedded preview allows you to see the resulting file names. No changes are made to the file system, the Renamer merely simulates the rename operation. It also checks for and indicates duplicate file names you may produce with your steps.

Example: Date and Sequence Number Format

The Renamr user interface.
The user interface of the Renamer.

In the screen shot above we create file names in the format: YYYY-MM-DD-nnnnn.ext format. At the bottom of the dialog box you see the source file name and destination file name. If you rename more then one file, you can click on the Preview… button to see the resulting file names for all files.

Example: Including the ISO Country Code and City Name

To create the more complex YYYYMMDD-Country Code-City Name-sequence number format explained in the table above, we just need a few more steps:

The File Renamer: Renaming files using county code and city name

The first step adds the date in the YYYYMMDD format. Then we add a – and the ISO country code. We follow up with another – and then the name of the city. The country code and city name are retrieved directly from the XMP metadata of the file by using the corresponding IMatch variables. The final two steps add yet another – and a 5-digit sequence number. For the sample image used for this demo, the resulting file name is: 20140321-USA-New York-28190.jpg.

See the Renamer topic in the IMatch help system for numerous additional examples and tips & tricks.

Important: Buddy and Sidecar Files

Most of the RAW processing software in use today (and also image editing software, audio and video processing tools) produce sidecar or ‘buddy’ files for each file you process. A typical example are XMP files which contain the XMP metadata for your RAW fies. If you have a _DSC12345.RAW file, the XMP file will be named _DSC12345.XMP.

RAW processors or image editing software also create a variety of other files with settings, configuration data or history info for each image you process in these applications. Sometimes these files are in the same folder as the image, sometimes in sub-folders.

When you rename an image file, it is important to rename the sidecar and buddy files as well. Otherwise you may break the ‘link’ between the image file and the sidecar files which can have dire consequences.

The Renamer cooperates with IMatch’s unique file relations concept and thus ‘knows’ about buddy and sidecar files – even if these are not indexed by your IMatch database. The Renamer automatically ensures that buddy and sidecar files are renamed together with the image file.

File Names in Digital Asset Management

The Renamer tool in IMatch enables you to create descriptive and consistent file names. It offers easy features to include date and time, arbitrary metadata, text and automatic numeric sequences in file names. By using the embedded preview you can test your rename results without making changes to the file system. The Renamer also cooperates with the unique file relations feature in IMatch to automatically rename buddy and sidecar files when the corresponding image is renamed.

Reclaim Disk Space by Removing ExifTool Temporary Files

ExifTool

IMatch uses the awesome ExifTool library to read and write metadata. This ensures optimal metadata quality and compatibility with a wide range of applications, digital asset management systems and web services.

ExifTool uses a Perl runtime environment. When an ExifTool version is first run on a computer, it creates a sub-folder in the system TEMP folder and extracts a copy of the Perl runtime files into that folder. This is basically it’s installation process, if you will.

The name of the folder is par-nnnn where nnnn is a random hexadecimal number. In the example below, the folder is named par-4d6172696f:

The par- folder with sub-folders for each ExifTool version used in the past.

The folder contains cache-nnnn sub-folders, one for each ExifTool version installed. Every time IMatch ships an new version of ExifTool, a new sub-folder is created. Old folders are not automatically deleted. If you don’t clean the TEMP folder on your system automatically or at regular intervals (e.g, using Windows disk cleanup), these old folders can take up quite a lot of disk space – about 15 MB for each folder. If you work with multiple users on the PC, a par-nnnn folder is created for each user in TEMP.

Deleting the par- Folder

When IMatch is running, close it. You cannot delete the folder while IMatch/ExifTool are still running.

To open the TEMP folder on your system, type %TEMP% into the Windows Explorer address bar and press <Enter>:

Open the TEMP folder
Opening the TEMP folder in Windows Explorer.

Then locate the par- folder and delete it. ExifTool automatically generates a new folder for the current version when you start IMatch the next time.

[font_text icon=”info-circle” color=”dark” size=”medium”]This information is also available in the IMatch help, in the ExifTool, Technical Reference topic.[/font_text]

Ignoring Small Embedded Previews in RAW Images

RAW Previews

Sometimes older RAW files have embedded preview images with dimensions much smaller than the RAW file itself. For example, some early cameras included smallish 1200 pixel previews even if the RAW had 3500 or more pixels in each dimension.

The digital asset management system IMatch by default uses the embedded preview image to produce the thumbnails and cache images. That’s usually a lot faster than extracting and developing the full RAW data. But if the embedded preview is much smaller than the RAW image itself, this may lead to unwanted results and too small images in IMatch (Quick Preview, Viewer, Slide Show).

Modern cameras usually embed 100% previews, but older cameras did not. If your image archive managed by IMatch contains files produced by older cameras, you may run into this problem. But there is an easy solution.

Cache Settings

You can handle this situation easily with the cache preferences in IMatch. Go to Edit > Preferences > Cache to view and configure cache settings.

The trick is to tell IMatch to use the cache image in general (for speed) but only if the cache image dimensions exceed a certain pixel size. For example, if the too small cache images are 1200 or 1600 pixel, set the Minimal Size property to 2000 pixel:

The IMatch Cache Preferences for RAW previews

IMatch then uses embedded previews (from your new RAW files with standard 100% size previews) but falls back to developing the full RAW image if the embedded preview is less than 2000 pixel in either dimension. This gives you 100% previews for all your RAW files, old and new.

WIC Codecs

Sometimes the installed WIC Codec is unable to extract the embedded preview. In this case it usually helps to install the most recent WIC codec provided by your camera vendor, or a 3rd party WIC codec.

You can use the built-in WIC diagnosis in IMatch to check if the WIC codec installed on your system supports a given RAW image:

  • Select the file you want to check in a File Window
  • From the Help > Support menu, choose WIC Diagnosis

After a few seconds, IMatch displays a text file which lists all installed WIC codecs, the file extensions they support and the results for the selected file. This shows you if the WIC codec was able to extract a thumbnail, a preview and the full RAW image.

See also the knowledge base article WIC Support and Codec Availability for more information about WIC codecs.

Consolidating XMP Color Labels

XMP Labels

XMP metadata includes an optional field named label. A label is a text or tag you can assign to an image. Digital asset management systems with XMP support like IMatch use this label for various purposes.

Common examples are labels like ‘Red’, ‘For Review’, ‘Für den Druck’ or similar. Most XMP-aware applications also associate colors with a specific label texts, e.g. using a red color indicator for files with the label text ‘Red’ or blue for ‘For Review’.

There is no standard for label texts or if and how label names are associated with colors. Or how an application displays labels and colors in the user interface.

IMatch displays XMP color labels in the File Window.

Applications and Languages

The fact that labels are ‘hard-coded’ text stored inside XMP metadata often leads to problems when you work with multiple XMP-aware applications, you switch RAW processors or you work in teams with a mix of tools and user interface languages.

A German RAW processor might write the label ‘Rot’ when you assign a red label to a file, while the English version of the same software writes ‘Red’ instead. Sometimes application vendors also change the label names between different versions of their products.

This may create a challenge for long-term archival, consistency and interoperability. Thankfully, IMatch has the features to handle this.

Labels in IMatch

IMatch supports XMP labels in a variety of features, e.g. in the File Window, the Metadata Panel or the Viewer. In order to be compatible with all label-generating applications out there, it handles any number of labels and allows you to add your own labels and associate colors with each label individually.

To configure XMP labels, open Edit > Preferences > Metadata. IMatch by default ships with a mix of labels which cover the most frequently used applications.

Configuring XMP labels

You can add, rename and remove the pre-configured labels to your liking. Add all label names used in your other applications and configure IMatch to use the same color to ensure inter-application consistency.

[font_text icon=”info-circle” color=”dark” size=”medium”]Note that changing a label here has no effect on the labels already stored in your files! To change a label globally, follow the instructions below.[/font_text]

Importing Labels

When you click the Import button, IMatch scans the database and adds all unique label names used in your files to this list. This makes it very easy to pick up the various labels used in your files, to assign colors or to re-arrange their order to make them directly accessible via the keyboard shortcuts <Shift>+<1> to <Shift>+<5>.

Consolidating Labels

Sometimes you need to replace labels in entire sets of files, e.g. in order to consolidate labels between applications or to change the language used for a label.

This can be done in IMatch using only two simple steps:

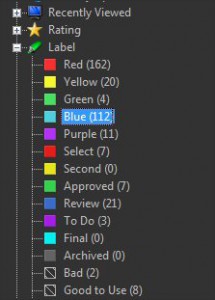
1. In the Collection View, click on the collection representing the label you want to change:

Label Collections in IMatch
IMatch automatically maintains collections for each label used in your database. To see all files with a specific label, just click on it.

2. Select all files in the File Window and assign the new label – that’s all. After a write-back, all files have the new label stored in their XMP data.

Using Google Picasa™ Face Tags in IMatch

[icon_text icon=”Warning” link=””] This article is for an older version of IMatch.
Since version 2020 IMatch includes AI-powered face detection technology and powerful features for managing people.
See People and Face Recognition in the IMatch help system for more information.[/icon_text]

Viewing, using and editing face tags created in Google Picasa or Adobe Lightroom is easy in IMatch.

When importing files, IMatch extracts face annotations created by these products from the XMP record and converts them into IMatch Face Annotations. When writing metadata, IMatch converts Face Annotations back into XMP regions automatically. This fully integrates faces into the powerful IMatch Annotations concept, while ensuring compatibility with all applications that support XMP face regions.

Face Annotations in IMatch

The digital asset management system IMatch 5 contains a face detection feature in the Viewer which works in conjunction with the unique IMatch 5 Face Annotations. With a single mouse-click you let IMatch 5 detect all faces in an image and then you tag these faces with a name. IMatch optionally converts this face tag into a hierarchical keyword. Working with Face Annotations in the Viewer is easy, and fast.

In addition, IMatch supports XMP face regions created by other applications. Since IMatch handles the conversion between simple XMP face regions and IMatch Face Annotations automatically, you don’t need to do anything – it just works seamlessly.

Working with Face Annotations in the IMatch Viewer. Click for a larger view.

Face Tags in Google Picasa™

Picasa is an entry-level image cataloging software from Google. The most notable feature of Picasa is that it employs the very advanced face recognition technology developed by Google.

IMatch can import face tags created in Picasa. If enabled, IMatch automatically converts face annotations into IMatch annotations, and the name tags into hierarchical keywords. It also maintains dedicated collections for images with face annotations, which makes it very easy to find and see all files with one or more persons.

Configuring Picasa

You need to configure Picasa to store face annotations in the XMP metadata inside the image file (Picasa only supports this for JPEG files at this time). Otherwise the data is only stored in the proprietary Picasa database and not accessible for other applications.

For recent Picasa versions, the corresponding option is available under Tools  > Options:

Picasa Options
Configure Picasa to store face annotations and tags in the image file.

Configuring IMatch

IMatch offers a number of options which allow you to control if you want to import face tags from Picasa and how to treat the tags assigned to these faces. You find these options under Edit > Preferences > Metadata. Press <F1> when the dialog is open to display the corresponding help topic with detailed information.

IMatch Face Annotation Options
IMatch Face Annotation Options.

[icon_text icon=”Warning” link=””]IMatch 2020 and later don’t directly import XMP face region tags into keywords. Instead, you can add any number of keywords to a person. And IMatch then ensures that the keywords are added to all files containing that person. See Person Keywords in the IMatch help for more information.[/icon_text]


Result

If you tag faces in Google Picasa and save these changes afterwards, IMatch imports the face information automatically and displays them as annotations in the Viewer. Face tags created and written by IMatch are also visible in Picasa.

fdssfsd
An image file with face tags in Google Picasa™

The same image in the IMatch Viewer:

Adobe Lightroom™

Recent versions of Adobe Lightroom also store face tags into XMP, using the format recommended by the Metadata Working Group. IMatch supports these face tags automatically and converts them into IMatch Face Annotations. You can see and edit them directly in the Viewer. When you make changes to Face Annotations or you create new Face Annotations in IMatch, they will be saved to the XMP record associated with the image file.  Lightroom then picks them up automatically when you let it reload the metadata.

 Summary

By enabling face tag import in IMatch 5, you can reuse existing face tags created in Google Picasa or other software. The only requirement is that these applications have to support the standard XMP metadata face annotation format, as defined by the Metadata Working Group.

IMatch converts the simple name tag added in Picasa into a proper hierarchical keywords and even allows you to specify where in your keyword hierarchy to import face keywords. The dedicated collections maintained for images with face annotations allow you to find images showing specific persons with a single mouse click.

Since IMatch also supports the face annotations managed by Adobe Lightroom, you have a perfect end-to-end workflow with either application.