In order to import XMP metadata into your IMatch 5 database, the XMP data has to exist in the image file or a corresponding sidecar file. IMatch 5 cannot import XMP metadata directly from the IMatch 3 database for technical reasons.
If you have never written back XMP metadata to your image files in IMatch 3, you may be faced with tens of thousands of files which have no up-to-date XMP metadata. Updating the XMP in all these files can take a very long time.
Note: This only affects XMP metadata. When you have updated classic IPTC or EXIF data in IMatch 3, this data has been written to the image file immediately and is thus always up-to-date.
The Trick
If the only XMP data you have used/updated in IMatch 3 are ratings and labels, you can use a trick to avoid having to write XMP data to all your files before importing them into IMatch 5.
You perform the trick before you migrate your existing IMatch 3 database into IMatch 5 with the Database Converter. The trick consists of three easy steps:
- Create a data-driven category for Rating and Label in.
This step creates one category for each rating and label you have used and assigns the corresponding files to that category. - Convert the data-driven categories into regular categories.
This ensures that IMatch 5 imports the rating and label categories automatically. - In IMatch 5, assign ratings and labels using these categories.
1. Create Data-driven Categories
Switch to the Category View in IMatch 3.
Select the @All category and press <Ins> to create a new child category. Name it Rating. Repeat these steps and create a category named Label:
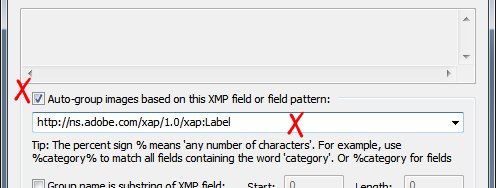
Right-click on Label and choose Properties. In the Properties dialog box, enable the Auto-group images based on… option and either select the XMP field
http://ns.adobe.com/xap/1.0/xap:Label
from the drop-down list or use copy/paste to transfer the name from above:
Click OK to close the dialog box and answer Yes when asked whether you want to create the category. After a short time, IMatch has finished creating the data-driven category Label:
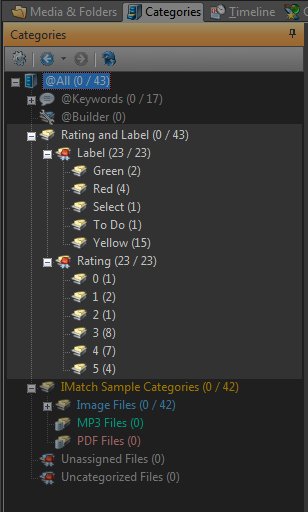
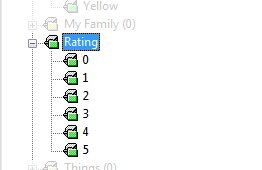
For each label used in your database, IMatch has created one child category under Label. Each child category contains all files with that label.
Repeat these steps for the Rating category: Select the Rating category, right-click and choose Properties. In the dialog, enable the option to Auto-group images based on… and select the following XMP field from the drop-down list:
http://ns.adobe.com/xap/1.0/xap:Rating
or copy it from above. Press OK to close the dialog and then answer the prompt with Yes. IMatch creates child categories for each rating used in your database and assigns all files with that rating:
2. Convert the Data-driven Categories Into Regular Categories
Select the @All category and press <Ins> to create a new category. Name it Rating and Label.
Select the Rating category created above. Left-click and drag it to the Rating and Label category. Release the mouse button. In the dialog, set the options as follows:
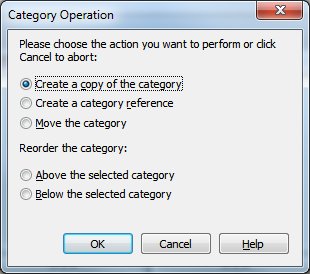
Click OK. IMatch now creates a copy of the entire Rating category (with child categories) under the Rating and Label category. The copy is a normal category, not a data-driven category – and this is exactly what we want.
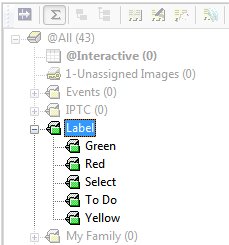
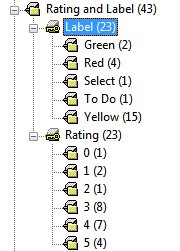
Repeat these steps for the data-driven Label category. The end result will look similar to this:
3. Migrate Your Database
Close IMatch 3 and run the IMatch 5 Database Converter to convert your database. Follow the instructions in the Database Converter help for a quick and smooth transfer.
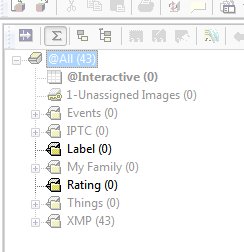
IMatch 5 automatically imports the Rating and Label category you have created. This transfers the information which files should have which rating and label from IMatch 3 to IMatch 5. And that’s the trick.
4. (Re-)Assign Ratings and Labels
Open your new database in IMatch 5. Switch to the Category View to see all categories imported from your IMatch 3 database. The Rating and Label category will be there:

Now start assigning ratings and labels:
Note: For the following steps, you should disable background write-back under Edit > Preferences > Background Processing if you have it enabled. This way IMatch only updates the database but does not automatically write-back data to the files on disk. This improves the performance during the following procedure.
Select the Green category under Rating and Label > Label. This shows you all files which had a Green label assigned in IMatch 3 in the File Window.
Select all files in the File Window with <Ctrl>+<A>. Right-click to open the context menu and choose Green to assign all files a Green XMP label:
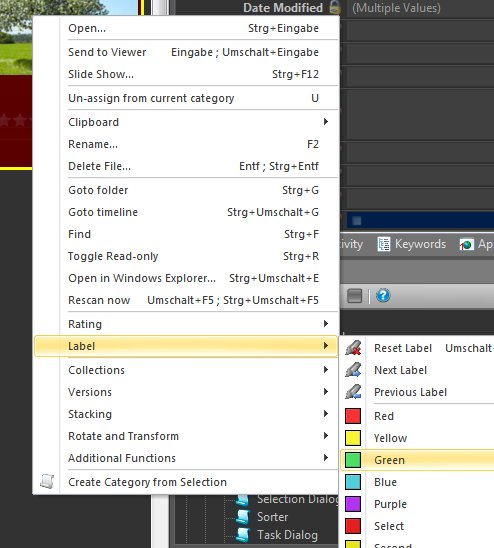
IMatch writes the Green label into the XMP record of each file and marks the files as pending because the metadata was changed. Repeat these steps for each Label and Rating category under Rating and Label. Then delete the Rating and Label category, it is no longer needed.
This trick takes quite a lot of text to explain, but in fact takes only a few minutes to execute. Much faster than writing back XMP data to thousands or even tens of thousands of files just to get the rating and label information imported into IMatch 5.