The File Window in IMatch can be customized in many ways using file window layouts. You have full control over whether you use a thumbnail or a tabular layout and over the data to be included for each file.

This know-how article explains some tricks which you can use with custom templates in conjunction with variables.
See the File Window Layouts help topic in the IMatch Help system for a full overview of all available features and many examples.
Custom Templates and Layouts
When creating a custom layout, you usually just pick the IMatch data elements and metadata tags to display in the file window. Maybe also change the font size, alignment or color. This already gives you a lot of control over the data you see for each file.
Even more options are available when you switch the layout element to use a custom template. This allows you to use IMatch Variables and all related functionality, plus a subset of XAML formatting to control font sizes, colors and other aspects of the output.
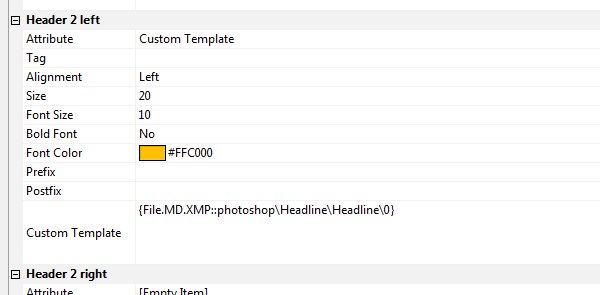
You can use custom templates for each of the four headers and 8 footers, mixing them freely with standard elements. In the following example we configured Header 2 left to display the XMP headline. We also changed the font size and the color:
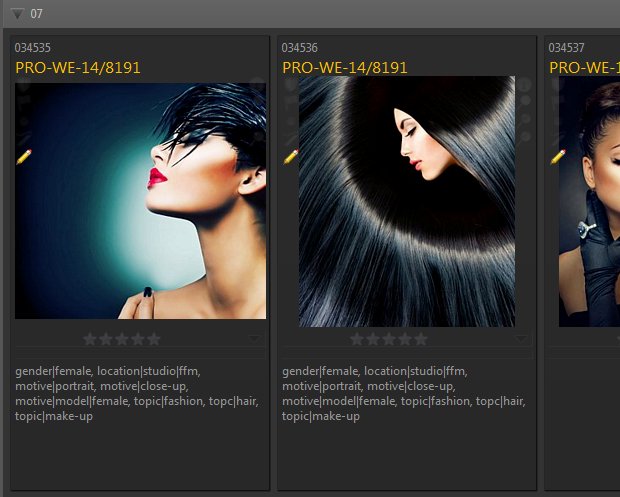
The resulting file window layout displays the contents of the XMP headline tag under the file name, in a bigger font and a orange color:
We could use any other variable, or multiple variables in the template. Whatever is needed to produce the output you want.
Displaying Lists
Some variables return lists of elements, e.g., the XMP hierarchicalKeywords variable or the Categories variables. IMatch separates list elements with the list separator character configured for Windows (usually ; or , ) . This results in values like “vacation;summer;family;holiday;Hawaii”.
IMatch offers a wide variety of variable functions, which allow you to manipulate the results of variables. By using the replace function, we can replace the default list separator ; with something different.
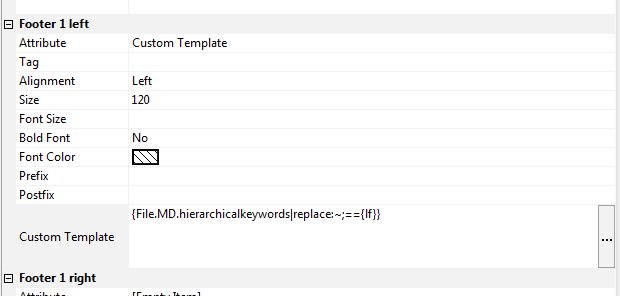
For example, if you want to display each keyword in a separate row, replace the ; with a line feed {lf}:
{File.MD.hierarchicalkeywords|replace:~;=={lf}}
Note that we use the short code for the variable instead of the full variable name ({File.MD.XMP::Lightroom\hierarchicalSubject\HierarchicalSubject}). The output is identical, but using the short code makes it easier to read.
To make room for the keywords, we increased the height of the footer to 120 pixel. If there are more keywords than there is room in the thumbnail panel, IMatch automatically crops the excess keywords.
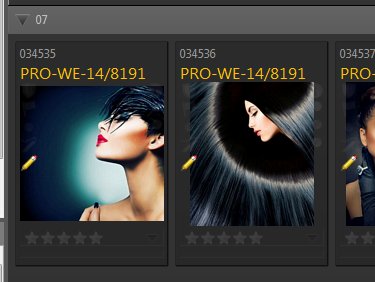
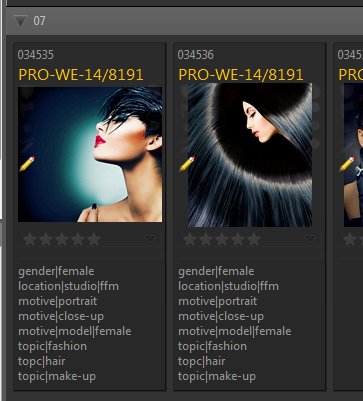
The resulting file window layout displays the keywords assigned to the file in the footer, with one keyword per row:
An Alternative: Let It Wrap
The approach to put each keyword on a single line may be a waste of screen space when you increase the thumbnail size. In this case there is likely enough room to fit multiple keywords per row.
To allow for that, we replace the ; separator with something like ,<blank> (a comma followed by a SPACE character). This allows the file window layout engine to fill the available space, automatically wrapping at the SPACE to create additional rows as needed. This variable
{File.MD.hierarchicalkeywords|replace:~;==, }
yields the desired result:

Displaying IMatch Attribute Data
Attributes allow you to create your own database inside the IMatch database. They are used to store custom data for each file, independent from the file format or the supported metadata. Attributes are great for purposes like keeping notes per file, submission tracking, billing, etc.
You can store any number of Attribute records per file. The corresponding variables return all values for a given attribute in a list semicolon-separated, just like the XMP hierarchicalSubject variable we used in the examples above.
In a recent post in the photools.community, a user asked how he can display this data in the file window. There may be multiple records per file, and each record may have multiple attributes.
For this example, we use a typical submission tracking Attribute Set. The IMatch user keeps track of which stock photo agencies (or web sites) he has submitted a file to, the state of the submission and the revenue. In the IMatch Attributes Panel, this looks like this:

See the Attributes topic in the IMatch help system for detailed information about the IMatch Attribute database. The Submission tracking is used there as an example as well.
The file used in the screen shot above has 3 attribute records, each keeping data about one submission. If you want to display this data (or some of it) inside the file window, you can use the same method described in the keywords example above: You use a custom template for the file window layout, and control the data to display with IMatch variables.
But how to deal with the multiple records per file? When we just use the variable
{File.AT.Submissions.Client}
IMatch returns a list of all values for the Client Attribute, separated with a semicolon : DaguckstDu Stock Fotos;Bright Eyes Stock Photography;Whoa! Stock. The same happens for {File.AT.Submissions.Amount}: 280,00 $;450,00 $;250,00 $. Not really helpful. We would like to see the client, the date the file was submitted and how much money we made from it next to each other, in the same row, somehow.
The Trick: Indexing Variables
To achieve this, we use the index variable function, which allows us to access individual elements (aka records) in the variable. For example:
{File.AT.Submissions.Client|index:0}
returns the name of the Client from the first record (variables start counting at 0). With index:1 we get the second record, and so on. Now, after making some experiments in the awesome Var Toy App which is included in IMatch (see the App Panel and the IMatch help), we created this:
{File.AT.Submissions.Client|index:0}↵
{File.AT.Submissions.Date submitted|format:YYYY-MM-DD;index:0}↵
{File.AT.Submissions.Amount|index:0}
We use three variables to access the Client, the Date Submitted and the Amount attributes. With index:0 we tell IMatch to return only the first record. The resulting output is:
DaguckstDu Stock Fotos 2015-04-06 280,00 $
which is exactly what we want. Now, we just duplicate this variable group a number of times to access the 0, 1, 2, 3 and 4th record (we assume that we don’t sell each image more than five times):
{File.AT.Submissions.Client|index:0} {File.AT.Submissions.Date submitted|format:YYYY-MM-DD;index:0;prefix:(;postfix:)}{File.AT.Submissions.Amount|index:0;prefix: : }
{File.AT.Submissions.Client|index:1} {File.AT.Submissions.Date submitted|format:YYYY-MM-DD;index:1;prefix:(;postfix:)}{File.AT.Submissions.Amount|index:1;prefix: : }
…
{File.AT.Submissions.Client|index:4} {File.AT.Submissions.Date submitted|format:YYYY-MM-DD;index:4;prefix:(;postfix:)}{File.AT.Submissions.Amount|index:4;prefix: : }
Each of these variable groups produces one row in the file window. If a file has only 1 or 2 records (or none), IMatch automatically suppresses the output of the remaining variables., no rows are emitted. Which is of course exactly what we want.
We used the prefix and postfix functions to add ( and ) around the date instead of just adding them as literal text. This means that the parentheses will not show when the variable itself is suppressed.
This may look a bit complicated, but it really isn’t. It’s just variables, but with a neat twist in order to create this advanced example. To give this a try, we created a tabular file window layout and the five groups of variables from above to a custom template:
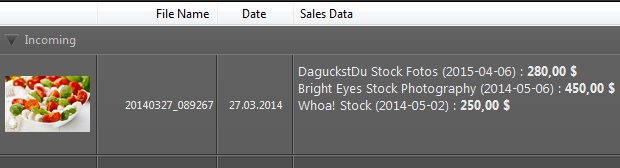
Each submission is displayed with the name of the client, the date of the submission and the amount of money created from that submission. Awesome!
Summary
File Window Layouts in IMatch enable you to control the data displayed in the file window. You can easily control the attributes or metadata to display, and also choose font sizes and colors.
If you need more advanced layouts, or you want to have fine control over the data to display, and how this data is formatted, you can use custom templates. In combination with IMatch variables this gives you a lot of options to work with.