This document contains a growing list of code recipes and tutorials.
Naming Conventions
Parameter names (sent to IMWS/IMatch) are always in lower-case: filename or numberoffiles.
Field and element names returned by IMatch in JSON responses are always in camelCase: fileName or numberOfFiles.
Asynchronous Calls and Promises
This is a common pitfall for users coming from older programming languages like BASIC.
JavaScript AJAX calls don't block! They work asynchronously in the background to keep the browser responsive.
When you send a request to IMWS or IMatch ('calling an endpoint') JavaScript and the browser call the endpoint in the background, while your JavaScript code is free to continue with whatever it needs to do.
This workflow allows your web page / app to remain responsive, while waiting for one or more (!) asynchronous web service calls to complete.
This is a concept that needs some re-thinking if you come from a more traditional programming language like BASIC or C.
The way you call an endpoint using IMWS.get is always the same:
IMWS.get('url of the endpoint to call',
{
    param1: 'Value',
    param2: 123,
    ...
}).then(function(response) {
    // Worked :-)
    // response contains the data received from IMWS.
    console.log(JSON.stringify(response,null,2));

},function(error) {
    // Failed :-(
    // error contains information about the problem.
    console.log('Oops. Something went wrong: ' + error.status);

});

// This code is executed while the endpoint is still running!
console.log('Your script continues while the IMWS.get function is working in the background!');
In this case we used the jQuery then syntax to handle the results of an asynchronous query.
The then branch is exdcuted when the promise is resolved or rejected (fails). The first function is called when the server returns a valid response (200 OK).
It receives a parameter that contains the JSON-formatted response returned by IMWS. In this function you process the result and the data returned by IMWS.
If the endpoint call fails, the second function is called. It takes an error parameter, containing the HTTP status code and additional error information. Here you can do error handling of some sorts.
Asynchronous Processing
Here comes the (for some) unexpected part. After sending the IMWS.get request, your script continues, executing the code following the function call! It does not stop and wait for the response form the server.
Depending on how busy the server is and where it is located (same machine or on a computer on the other side of the planet), it may take 0.1 or 10 seconds to retrieve the answer.
Blocking the script and the web browser during this time would be a dumb idea and a bad user experience.
This is why your browser performs AJAX calls in the background, while your script continues to work.
You can use this to update the UI, display some sort of 'Busy' indicator or whatever. As soon as the answer has been retrieved,
the Promise returned by IMWS.get is resolved or rejected - depending on whether the server call was successful or not.
The then function is executed and either the first(response) or second(error) function is executed. Now your script processes the result from the server and does whatever needs doing.
But how do I wait until an endpoint call is complete?
This often comes up when people start working with AJAX and JavaScript. In old-style procedural code, a programmer could write something like this:
if (folderExists('c:\\images\\beach')) {
    // Code that executes when the folder exists.
}
This calls some function/method in the application or a library that returns true or false, depending on whether or not the folder exists. When using a web service like IMWS with JavaScript, this is asynchronous and the code has to written a bit differently (using jQuery in this case):
IMWS.get('v1/folders',{
    path: 'c:\\images\\beach',
    fields: 'id'
}).then(response => {
    if (response.folders.length > 0) {
        // Code that executes when the folder exists.
    }
});
We use the v1/folders endpoint to retrieve the id of the folder c:\images\beach. This endpoint call is performed asynchronously, in the background. We don't know how long it takes.
When IMWS has responded, the then branch is executed and we can check if an id was returned (folder exists) or not (folder does not exist).
The big advantage of this is that our app/script can do other things while waiting for IMWS to reply. It can even do other endpoint calls, IMWS can handle multiple requests simultaneously. The result are more responsive apps, which don't block and wait for potentially busy or remote web services to respond.
Note: We used the shorter ES6 syntax then(response => { for this example.
A Simpler Way: Using Async and Await
Modern JavaScript versions (and fully supported by the browser running the apps in IMatch) include a feature which makes dealing with asynchronous calls and promises easier.
Consider the following function:
async function doSomeWork()
{
    try {
        // 1.  Fetch information about all files currently selected in the file window:
        // Note: This line blocks until the reply from the server is received!
        console.log("Fetching...");
        let response = await IMWS.get('v1/files', { idlist: IMatch.idlist.fileWindowSelection, fields: 'id,name,path'} );

        // 2.  Now response contains the response from the server and we can work with it.
        console.log("...fetchign completed.");
    }
    catch(error) {
        // Handle the error returned by the server.
    }
}

doSomeWork();
console.log("I'm continuing...");
The important bits are the async declaration for the function and the await specifier.
Note: You can use await only in a function declared as async. It tells the JavaScript runtime system to wait for the promise returned by the called function to resolve.
The code effectively blocks until the server has responsed. This simplifies calling asynchronous endpoints, especially when nesting is required or multiple calls need to be made.
Note that the code from which you call the example doSomeWork() function does not wait for doSomeWork to complete! It continues with the line following the function call.
Learn Your Tools
Modern browsers like Chrome, FireFox or Edge have powerful built-in developer tools. From code inspectors to full-fledged debuggers which allow you to step through your JavaScript code. Spending some time with learning how the developer tools in your favorite browser is a good idea. It will save you lots of time later. All browser vendors offer on-line tutorials and training videos for free.
Debugging IMatch Apps
The embedded web browser in IMatch is based on Chromium, the same engine Google's Chrome browser is based on. This not only gives IMatch a modern and super-fast browser, but it also enables you to connect from a separate Chrome browser to the apps currently running in IMatch. This allows you to debug apps with the full power of Chrome's developer tools.
All you need to to is to configure the debugger port to use in IMatch under Edit > Preferences and then to connect from Chrome to this port.
For example, if you have configured the port 49777 as the debugging port, you can use this URL to connect with Google Chrome to the apps running in IMatch: http://localhost:49777/
Google Chrome connects to the Chromium browsers running inside IMatch and shows you a list of all currently running apps:
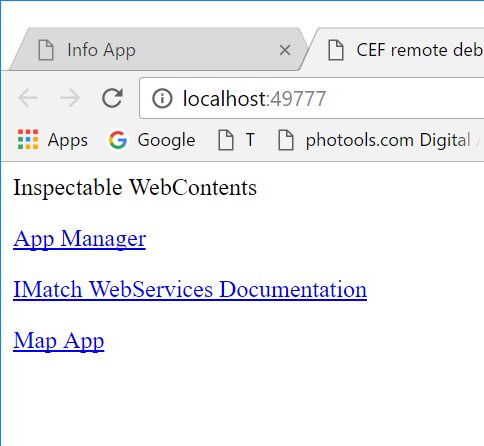
Click on any of these links to connect to the app and start debugging.
Using the Sample Apps for Your Own Experiments
If you want to use any of the apps shipping with IMatch as the basis for your own apps, feel free to do so!
To make this work, follow these instructions:
-
Locate the app in the file system
You can do that directly from the App Manager which offers a command to open the folder containing the app in Windows Explorer. - Copy the App
Copy the complete app folder to the user app folder (typicallyC:\ProgramData\photools.com\IMatch6\webroot\user). - Update the
app.jsonfile
Open the app file in your text editor and change the id to make it unique. Also change the app name and description to your liking.
For more information about the app.json, see the app.json documentation. - Update the HTML <title>
Open the index.html in your text editor and change the <title> tag at the top to the name of your app.
Iterating over All Selected Files
Most endpoints which work with files accept either a comma-separated list of file ids or the name of an idlist. Some even accept a file name.
IMatch maintains several dynamic idlists like @imatch.filewindow.active.selection which you can use in your code.
The IMatch JavaScript wrapper class has constants for these idlists so you don't need to remember the full names.
The idlist IMatch.idlist.fileWindowSelection represents the list of selected files in the active file window. This idlist you will use most.
IMWS.get('v1/files',{
    idlist: IMatch.idlist.fileWindowSelection,
    fields: 'id,filename'
}).then(function(response) {
    response.files.forEach(function(f) {
        console.log(f.fileName);
    }, this);
});
This code fragment retrieves the id and fully-qualified file name for each file currently selected in the active file window.
It uses the get method of the IMWS JavaScript class to call the v1/files endpoint.
To specify which files to retrieve, it uses the idlist parameter with the IMatch.idlist.fileWindowSelection constant.
The fields parameter controls which information is retrieved for each file. For a list of all available fields, please see the IMWS documentation.
Like all AJAX calls, IMWS.get is asynchronous and returns a Promise. When the promise is fulfilled, the then branch is executed.
It uses a forEach loop to iterate over all file records returned in response.files array.
Accessing Metadata Tags with /files
Instead of fields (or in addition to) you use one or more tag* parameters.
tag* Parameter Syntax
The syntax for tag* is as follows:
tagName=tag name (shortcode or fully qualified tag name supported).
The tag prefix is followed by the element name IMWS should use when returning the data. This allows you to control how the data is named in the JSON response.
After the = follows the shortcode or the fully qualified tag name. See the IMatch help for full details.
Examples:
tagtitle='title' Returns the contents of the XMP title tag in an element with the name 'title'.
tagkeywords='hierarchicalkeywords' Returns the keywords as an array with the nane 'keywords'.
tagdesc='description' Returns the XMP description in the element named 'desc'
tagdate='XMP::xmp\\ModifyDate\\ModifyDate' Returns the modify date in the element 'date'. Don't forget to double \ to escape it (JavaScript requires this).
tagMySillyName='headline' Returns the headline in 'MySillyName'.
IMWS.get('v1/files',{
    idlist: IMatch.idlist.fileWindowSelection,
    fields: 'id,filename',
    tagtitle: 'title',
    tagdate: 'XMP::xmp\\ModifyDate\\ModifyDate',
    tagkeywords='hierarchicalkeywords',
    tagMySillyName: 'headline'
}).then(response => {
    // Used the shorter ES6 syntax response => { instead of function(response) {
    console.log(JSON.stringify(response,null,2));
});
If one file is selected, the above code returns something like
{
  "files": [
    {
      "id": 10456,
      "fileName": "c:\\images\\beach.jpg",
      "date": "2017:05:06 16:35:49+02:00",
      "title": "PTC-JENS-15102 Jensen Family",
      "keywords": ["beach","sun","location|country|USA"]
      "MySillyName": "This is the headline"
    }
  ],code
Accessing the Focused File
To access the currently focused file in the active file window, use the IMatch.idlist.fileWindowFocusedFile constant with the idlist parameter.
IMWS.get('v1/idlist',{
    name: '@imatch.filewindow.active.focusedfile' // or: IMatch.idlist.fileWindowFocusedFile
}).then(function(response) {
    if (response.id.length == 0) {
        console.log('No file focused.');
    }
    else {
        console.log('Focused file: ' + response.id[0]);
    }
});
Iterating over an idlist
To access the ids in an idlist, you can use the v1/idlist code endpoint. It takes a number of optional parameters, and the mandatory name parameter.
IMWS.get('v1/idlist',{
    name: IMatch.idlist.fileWindowFiles
}).then(function(response) {
    console.log(JSON.stringify(response,null,2));
});
This code fragment retrieves the contents of the idlist with the name @imatch.filewindow.active.files (by using the corresponding constant of the IMatch class).
This idlist contains all files currently in the file window, after filters and search results have been applied. This is the same set of files the user sees in the file window.
After the promise has resolved, it dumps the contents of the response into the console window, using JSON.stringify to make it human-readable. The output looks similar to this:
{
  "size": 5,
  "index": 0,
  "id": [
    92,
    93,
    98,
    102,
    103,
  ]
}
IMWS returns the size (number of elements) in the idlist, the current index (for paging) and an array with each id. To iterate over each file, use code like:
IMWS.get('v1/idlist',{
    name: IMatch.idlist.fileWindowFiles
}).then(function(response) {
    // For each id in the returned id array...
    response.id.forEach(function(id) {
        console.log(id);
    });
});
idlist Paging - Process Any Number of Files Efficiently
Often it is not doable to process the data for all files in an idlist in one go. or that you can use paging. Paging means to divide an idlist into pages. Each page contains a specific number of files. How many files are on a page is completely under the control of your app.
Consider an idlist with 1,000 files. When you use the /files endpoint to download data for this idlist, you get 1000 file records back. This is manageable. But what if the idlist has 100,000 files?
For that, you can use the optional parameters pagesize and page with /files. The first parameter is the page size your app wants to use, the page parameter is the 0-based page number.
IMWS.get('v1/files',{
    idlist: IMatch.idlist.fileWindowFiles,
    pagesize: 50,
    page: 0,
    fields: 'id,filename'
}).then(function(response) {
    ...
});
This code fragment retrieves information about the files in the file window. Instead of retrieving the data for all files at once, it uses paging. The page size is 50 and the first page (page: 0) is retrieved. This returns data for 50 files (if there are that many files in the file window).
If your app has processed the result and needs more data, it does the same endpoint call again, but this time with the parameter page: 1.
This returns the data for the second page of files (file number 51 to 100). Repeat this as long as 50 files are returned, always incrementing the page parameter. If less than pagesize files are returned, the last page is reached and you're done.
Using this simple logic, you can process any number of files in any convenient batch size. Works for 29 files as well as for 300,000 files.
Loading and Saving App Settings and Stuff...
The /data endpoint family enables you to store and load arbitrary data in a database maintained by IMWS for that purpose. This is basically a very simple form of cloud data storage.
The data store supports text data of any length. Each data item is identified with a unique key. IMWS takes the data sent by your app and stores it under the key. Later your app can retrieve the data again using the same key. This is ideal to store any kind of setting, configuration data, history data or whatever an app needs to remember. Your app can store global data (available for all users) and it can store data on a per-user basis, by incorporating the user name into the key somehow. An app can store any number of data values.
If your app needs to store something private, apply some form of encryption on the data you store.
Text Only
The data store can only store text (strings). But thanks to the JSON.stringify function in JavaScript you can convert any JavaScript object into plain text. With JSON.parse you can later transform the text back into a proper JavaScript object.
Many of apps included in IMatch uses this to store settings and to later recall them.
Example
The following code fragment shows how an app can store configuration data in IMWS. The app uses an object named config to manage some data.
To store this data in the IMWS data store, it does a POST request with the name (key) and the config object converted into text:
var config = {
    version: 1
    count : 123,
    str : 'This is some text',
    enabled : true
}

// Store the data into IMWS
IMWS.post('v1/data',{
    name : 'app_name_config_data',
    value: JSON.stringify(config)
});
To retrieve previously stored data, it performs a GET request on the same key:
IMWS.get('v1/data',{
    name : 'app_name_config_data',
}).then(function(response) {
    // Convert from text back into a JavaScript object
    config = JSON.parse(response.value);
});
If no data exists for the given key, IMWS returns an HTTP 404 error and the then branch is not executed.
To handle this, you always setup your config object with default values as shown above. This way, when no data was stored before, your app just works with the default values.
Versioning Data
If you write an app that evolves and changes often, chances are that your config object will also change. You should always include some sort of version number in your config data. This allows you to check if the data loaded from IMWS is older and then process it differently:
var config = {
        version: 1, // The current version number
        count : 123,
        str : 'This is some text',
        enabled : true
    }

IMWS.get('v1/data',{
    name : 'app_name_config_data',
}).then(function(response) {
    var data = JSON.parse(response.value);
    if (data.version == config.version) {
        config = data;
    }
    else if (version == 1) {
        // ...
    }
    else if (version == 2) {
        // ...
    }
});
Naming Keys
The key name under which you store data is completely up to you.
But you should make sure that you use unique key names which are not likely to be used by other apps.
One way to achieve this is to use the name of your app as part of the key. For example: photools.com.imatch.mapapp.config.
Another way is to use a globally unique identifier (GUID). There are many web sites which allow you to create such identifiers, and IMatch offers the imatch/guid to create one. GUIDs look like this: B82FF09D-DB5D-45A8-8B38-2964228A7712
User-specific Data
Often your app will need to store configuration data on a per-user basis. To do this, just incorporate the name of the current user into the key name (e.g, append it). To get the name of the logged in user, use the imatch/user/info or the IMWS /info endpoint. Both return the name of the currently active user or the user associated with the current session.
Database-specific Data
If you need to store database tied to a specific database, incorporate the unqiue id of the database into the key. You can get this information from the /info endpoint
Example: User- and Database-specific Keys
The following code fragment shows how to use per-user and per-database keys
// These are the keys we use to access the data store.
// Before we use the keys, we'll replace {u} with the name of the current user and {db} with the unique database id.
var DATA_KEY_NAME = 'myapp.{u}.setting1';
var DATA_OTHER_KEY_NAME = 'myapp.{db}.setting2';
var DATA_YET_ANOTHER_KEY_NAME = 'myapp.{db}.{u}.setting3';
...
// First use the /info endpoint to get information about IMWS and the current database.
IMWS.get('info').then(function(response) {
    // Replace the {db} placeholder with the unique id of the database.
    // This changes the keys to something like: myapp.1627-4242-AABD-6BCAD.setting2
    DATA_OTHER_KEY_NAME = DATA_OTHER_KEY_NAME.replace('{db}',response.database.uniqueId);
    DATA_YET_ANOTHER_KEY_NAME = DATA_YET_ANOTHER_KEY_NAME.replace('{db}',response.database.uniqueId);

    // Now load the info about the user
    IMatch.userInfo().then(function(response) {
        // This changes the keys to someething like: myapp.Mario.setting1
        DATA_KEY_NAME = DATA_KEY_NAME.replace('{u}',userInfo.userName);
        DATA_YET_ANOTHER_KEY_NAME = DATA_YET_ANOTHER_KEY_NAME.replace('{u}',userInfo.userName);
    });
});
Searching
The endpoints of the /search family allow you to search the database. You can search for file names, metadata, attributes and geo locations.
For example, to find all files with file names containing the word beach in the database, you use something like this:
IMWS.get('v1/search/filename',{
    // Where to search (see endpoint documentation for a list of supported scopes)
    scope: 'database',
    // What to search
    pattern: 'beach',
    // The information to return for each file.
    fields: 'id,filename'
}).then(function(response) {
    console.log(JSON.stringify(response,null,2));
});
pattern is a standard IMatch regular expression in PERL syntax. This allows for simple and also very advanced searches.
Note: that this endpoint searches the file name and extension but not the folder name.
Searching Metadata
Use v1/search/metadata to search for metadata. This is a very powerful and flexible endpoint. It uses the internal IMatch search engine.
This code fragment searches the entire database for files containing the word cat somewhere.
IMWS.get('v1/search/metadata',{
    // What to search?
    pattern: 'cat',
    // Where?
    scope: 'database',
    // How?
    op: 'contains',
    // The information to return for each file.
    fields: 'id,filename'
}).then(response => {
    console.log(`${response.files.length} files found.`);
    response.files.forEach(f => {
        console.log(f.fileName);
    });
});
Note: We used the more modern ES6 syntax for this example.
Updating Metadata
Updating metadata is a complex process. The endpoints published by IMWS try to make this easy, safe and fast.
Metadata updates are batch-oriented to improve performance and give script authors additional control over transaction processing.
Tasks
The v1/metadata endpoint expects a JSON-formatted structure in the body of the post request. This structure describes a number of tasks to perform.
All tasks are performed in one database transaction. They either complete successfully or leave no trace in the database.
An example task structure in JSON format looks like this (set the rating of the file with the id 190 to 3):
{
	"tasks": [
        {
            "id": "190",
            "tag": "rating",
            "op": "set",
            "value": 3
        }
    ]
}
In the next example, the rating and label or three files is updated in one batch (one transaction):
{
	"tasks": [
        {
			"id": "190,191,192",
			"tag": "rating",
			"op": "set",
			"value": 3
		},
		{
			"id": "190,191,192",
			"tag": "label",
			"op": "set",
			"blue": 3
		}
	]
}
We can specify any number of tasks in the tasks array and send them to IMWS as one batch. IMWS performs all operations in the array in one transaction, which improves performance a lot.
In this example here we clear (delete) the rating and label for all files currently selected in the file window:
{
	"tasks": [
        {
			"idlist": "@imatch.filewindow.active.selection",
			"tag": "rating",
			"op": "delete"
		},
		{
			"idlist": "@imatch.filewindow.active.selection",
			"tag": "label",
			"op": "delete"
		}
	]
}
Performance Tip: If you need to update values for hundreds or thousands of files, you can achieve a far better performance if you combine updates into fewer endpoint calls with larger tasks arrays. Try to call the endpoint once for, say, 50 files (using 50 task objects) instead of calling it 50 times with one task object each.
The task Object
| Element | Description | ||||||||||||||
|---|---|---|---|---|---|---|---|---|---|---|---|---|---|---|---|
id | A numerical file id or an array with one or more numerical file ids. Use either id, idlist or path. | ||||||||||||||
idlist | The name of an idlist to use. Either id or idlist must be specified. | ||||||||||||||
path | A fully-qualified file name. | ||||||||||||||
mediaid | Optional, used with path to specify a specific media. | ||||||||||||||
tag | The metadata tag to modify. Both IMatch shortcodes (createdate) and regular tag names (XMP::xmp\CreateDate\CreateDate) are supported. | ||||||||||||||
lang | ISO language code, for language-specific tags. | ||||||||||||||
op |
This parameter specifies the operation to perform.
| ||||||||||||||
value | The value to use for set, add, append or prepend.Floating point numbers must be specified using a decimal point, and witout any thousand groupings: 533422.12345.To avoid precision loss and rounding, specify floating point numbers as strings instead of numbers (e.g., use Javascript.number.toString()): "50.1236789" instead of 55.1236789.
| ||||||||||||||
replace | Used with the replace op. It specifies the value to replace: 'Replace banana with apple'. | ||||||||||||||
with | Used with the replace op. It specifies the value to replace with. | ||||||||||||||
where | Used with the replace op. It can be used to specify in which values to replace something. The replace operation is only performed if the where clause matches the value. | ||||||||||||||
unique | Optional. Default: true. Used with the add op. The new value is added only when it not already exists. Very handy to add unique keywords. | ||||||||||||||
rawvalue | Optional. Default: false. If this is true, the RAW value of the tag is updated, not the formatted value. Use this for numerical tags like GPS coordinates when you want to set the using decimal formats (0.2829) instead of the ° ' " formats used for the formatted value.
Modifying the RAW value clears the formatted value in the database.
During write-back, IMatch writes the modified RAW value. When IMatch reimports the metadata from the file afterwards, it fills the formatted value again from the data delivered by ExifTool. | ||||||||||||||
split | Optional. For text-type tags. This string specifies the split character for the supplied values. For example, if you supply "bean,potato,tomato" you can specify the comma , as the split character to tell IMWS to add 3 separate values. | ||||||||||||||
regexp | Optional. Default: false. For the replace op only.Set this to true of the where and with parameters are regular expressions. | ||||||||||||||
ignorecase | Optional. Default: false. Used with the regexp element. Set this to perform case-insensitive replacements. | ||||||||||||||
firstmatchonly | Optional. Default: false. Used with the replace and delete ops. If this is true, only the first matching value is replaced/deleted. | ||||||||||||||
thesauruslookup | Optional. Default: false. If hierarchical keywords are added, this option can be specified as true to search each specified keyword in the thesaurus and to add the result of that search instead. This allows you to transform flat keywords into hierarchical keywords, the same method used by IMatch when importing flat keywords.
| ||||||||||||||
applysynonyms | Optional. Default: false. Used in combination with thesauruslookupIf this is true, the synonyms (if any) of the keywords found during the lookup operation are also added.
|
Putting It All Together
Adding Keywords
Below is a complete JavaScript example which appends two keywords to a file. The keywords will only be added when they not already exist.
var tasks = [
    {
        idlist: IMatch.idlist.fileWindowSelection,
        tag: 'hierarchicalkeywords',
        op: 'add',
        value: ['banana','apple'],
        unique: true,
    }
]

IMWS.post('v1/metadata',{

    tasks: JSON.stringify(tasks)

}).then(function(response) {
    console.log(JSON.stringify(response,null,2));
},function(error) {
    console.log('Oops. Something went wrong: ' + error.status);
});
We first setup a tasks array with one task object. This object describes what we want to do (op = 'add'), which tag to use, the values to set (we use an array of two strings).
The unique option ensures that the keywords are not added if they already exist.
Then we use this tasks array with the v1/metadata endpoint to send the data to IMWS.
Note the use of JSON.stringify to convert the JavaScript object into a string when preparing the parameters to send to IMWS.
Set the Description of a File
var tasks = [
    {
        id: 100,
        tag: 'description',
        op: 'set',
        value: 'This is the new description for the file with id 100.'
    }
]
Set the GPS Coordinates of a File
GPS coordinates have both a 'formatted' and a raw value. The formatted value, as produced by ExifTool, uses degrees, minutes and seconds. The raw value uses decimal coordinates.
In most cases when you update GPS coordinates (or similar tags) you specify the raw value and use the rawvalue element to tell IMWS that you want to update the raw and not the formatted value.
Note: The formatted value is updated automatically during write-back. IMatch writes the raw value, and on re-import after the write-back, it receives the new formatted value from ExifTool.
var tasks = [
    {
        {
            id: 100,
            tag: 'gpslatitude',
            op: 'set',
            rawvalue : true,
            value: 51.510121
        },
        {
            id: 100,
            tag: 'gpslongitude',
            op: 'set',
            rawvalue : true,
            value: -0.136357
        },
        {
            id: 100,
            tag: 'gpsaltitude',
            op: 'set',
            rawvalue : true,
            value: 123.456
        }
    }
]
'Repairing' Metadata
A common use case for scripts is to fix metadata or spelling errors. The following task structure replaces the misspelled word 'Bech' with 'Beach' in the title and the description:
var tasks = [
    {
        idlist: IMatch.idlist.fileWindowSelection,
        tag: 'title',
        op: 'replace',
        replace: 'Bech',
        with: 'Beach',
        unique: true,
    },
    {
        idlist: IMatch.idlist.fileWindowSelection,
        tag: 'headline',
        op: 'replace',
        replace: 'Bech',
        with: 'Beach',
        unique: true,
    }
]
This example uses two tasks objects. One to fix the title, and another to fix the description. You can chain any number of tasks together that way. All will be performed within a single transaction by IMWS. The rest of the code is the same as in the previous example.
Working with Collections
IMatch provides endpoints to access collections like Rating, Label or Bookmarks. Many of these collections can also be modified by scripts to add or remove files.
This code fragment lists the id and internal (non-translated) path of each collection in your database:
IMWS.get('v1/collections', {
    id: 'all',
    fields: 'id,internalpath.mutable'
}).then(response => {
    console.log(JSON.stringify(response,null,2));
});
The internal path is what you use when you work with collection endpoints and their path parameter. mutable tells you whether or not this collection can be updated by an app.
To update a collection, you use the /collections endpoint with the POST method. It uses an tasks parameter which is a JSON object that describes the operation to perform.
The tasks Object
| Element | Description |
|---|---|
op | The operation to perform. Supported are add and remove. |
id | The id of the collection to update. Use either this or path. |
path | The internal path of the collection to update. |
The following code fragment adds a couple of files to the Bookmarks and removes them from the Pins|Green collection:
IMWS.post('v1/collections',{
    id: '1,2,100,210',
    tasks: JSON.stringify([
        {
            "op": "add",
            "path" : 'Bookmarks'
        },
        {
            "op": "remove",
            "path" : 'Pins|Green'
        }
    ])
}).then(function(response) {
},function(error) {
});
Note that not all collections are updatable by apps. Check the mutable property returned by the collections endpoint (see above). The Rating and Label collections are not updatable, for example. You must use the /metadata endpoints to modify XMP ratings and labels.
Working with IMatch Attributes
The /attributes endpoint allows you to read and write Attributes.
Getting Schema Information
To learn about the Attribute Sets and their Attributes in your database, use the attributes/schema endpoint. The following code fragment lists all Attribute Sets and their Attributes:
IMWS.get('v1/attributes/schema',{
}).then(function(response) {
     console.log(JSON.stringify(response,null,2));
});
This endpoint returns JSON data in the following format:
...
{
    "id": 1,
    "name": "Notes",
    "description": "",
    "class": "file",
    "attributes": [
    {
        "id": 1,
        "name": "Note",
        "description": "",
        "dataType": "string",
        "sortSequence": 0,
        "currencySymbol": "",
        "unique": "false"
    },
    {
        "id": 3,
        "name": "Description",
        "description": "",
        "dataType": "string",
        "sortSequence": 1,
        "currencySymbol": "",
        "unique": "false"
    },
        "unique": "false"
    },
    {
        "id": 7,
        "name": "Shelf Id",
        "description": "",
        "dataType": "reference",
        "sortSequence": 4,
        "currencySymbol": "",
        "unique": "false",
        "reference": {
            "set": {
                "id": 3,
                "name": "Shelf"
            },
            "attribute": {
                "id": 6,
                "name": "ID"
            }
        }
    }
}
...
Data returned for Sets:
| Element | Description |
|---|---|
id | Unique id of the Attribute Set |
name | The name of the Attribute Set |
description | An optional description |
class | The class of the set: file or global. |
attributes | Array with Attribute schema data. |
Data returned for Attributes:
| Element | Description | ||||||||||||||||||||||
|---|---|---|---|---|---|---|---|---|---|---|---|---|---|---|---|---|---|---|---|---|---|---|---|
id | Unique id of the Attribute | ||||||||||||||||||||||
name | The name of the Attribute | ||||||||||||||||||||||
description | An optional description | ||||||||||||||||||||||
dataType | The data type of this attribute.
| ||||||||||||||||||||||
sortSequence | Numeric index, determining the order of Attributes (aka columns) in the Attributes Panel. | ||||||||||||||||||||||
currencySymbol | If this is a currency data type, this is the currency symbol specified by the user. | ||||||||||||||||||||||
unique | true if this Attribute must store only unique values. | ||||||||||||||||||||||
reference | If this is a reference Attribute, the Set id and Attribute id of this reference. |
Reading Attribute Data
We have a Notes Attribute Set with the properties Note, Description, Date and Count.
We want to retrieve the Attribute data for Note, Description and Date for the currently focused file.
IMWS.get('v1/attributes',{
    // For which files?
    idlist: IMatch.idlist.fileWindowFocusedFile,
    // Which set?
    set: 'Notes',
    // Which attributes to retrieve?
    attributes: 'Note,Description,Date'
}).then(function(response) {
     console.log(JSON.stringify(response,null,2));
});
If the focused file has four Attribute records, the result looks like this:
{
  "result": [
    {
      // File id
      "id": 10470,
      // Data for this file
      "data": [
        {
          "instanceId": 1,
          "Note": "This is another note.",
          "Description": "A description for this note.",
          "Date": "2017-06-03",
          "Bool": "1",
          "Fee": "124.6754"
        },
        {
          "instanceId": 2,
          "Note": "This is a note.",
          "Description": "This is a description.",
          "Date": "2017-07-01"
          "Bool": "0",
          "Fee": "897.6701"
        }
      ]
    }
  ]
}
Attribute Data Format
IMWS always returns Attribute data in the internal representation used by IMatch itself - Strings.
Floating point numbers (Real or Currency) are returned with decimal point ("123.456"), Boolean types are returned as "1" (true) or "0" (false).
Date and times are returned in standard ISO 8601 format: "YYYY-MM-DDTHH:MM:SS.S100[Z|+/-HH:MM]": "2017-12-24" (date only) or "12:00:01" (time only) or "2017-12-24H12:00:01" (date and time) etc.
This is also the format in which the input parameters are expected when you update Attribute data.
Instance Ids
An Attribute Set can hold a virtually unlimited number of elements (records). Each Attribute record has an unique instance id which identifies it.To update or delete an Attribute record, you need to specify the instance id of the record to update or delete. IMWS returns the instance id as part of the response when you query Attribute data.
Adding and Updating Attribute Data
The /attributes endpoint used with the POST method allows you to add, update, replace or delete Attribute data.
The endpoint requires a set name or set id and a tasks array which descriptions the operations to perform. If you want to update a per-file Attribute Set you also need to specify a list of file ids or an idlist.
The tasks Array
This array holds 1 to many objects with the following elements:
| Element | Description |
|---|---|
op | The operation to perform. Supported are add, update and delete. To implement a 'replace' combine delete with add. |
instanceid | An array of instance ids. For update and delete operations, the instance id(s) of the Attribute record(s) to manipulate. |
data | An object with name:value pairs. name specifies the name of the Attribute, and value the value to set or add. |
Adding Attribute Records
The following JSON object adds one Attribute record for the Notes set for each selected file. This is what we need to send with POST:
{
  "set": "Notes",
  "idlist": "@imatch.filewindow.active.selection",
  "tasks": [
        {
            "op" : "add",
            "data" : {
                "Note":"This is a new note.",
                "Description":"Put your description here.",
                "Date":"2017-07-31"
            }
        }
    ]
}
To produce this in JavaScript, we can use the following code:
var task = {
    // We add a record
    op : 'add',
    // This contains the data we add.
    // One value for each attribute in the set.
    // If an attribute is not specified, it will be added
    // as null or with the default value (if one is defined)
    data : {}
}
task.data['Note'] = 'This is a new note.';
task.data['Description'] = 'Put your description here.';
task.data['Date'] = '2017-07-31';

var tasks = [];
// We can perform any number of tasks in a single call.
// For now, we use only one task
tasks.push(task);

// Prepare the parameters to send to IMatch
var params = {
    // The set to update
    set: 'Notes',
    // We operate on all selected files.
    idlist: IMatch.idlist.fileWindowSelection,
    // The tasks to perform
    tasks: JSON.stringify(tasks)
}

// Call the endpoint
IMWS.post('v1/attributes',params).then(function(response) {
    console.log(JSON.stringify(response,null,2));
},
function(error){
    console.log(JSON.stringify(error,null,2));
});
If the operation is successful, IMWS returns a result like this (Assuming one file was selected):
{
    "result" : "ok",
    "addedInstances":[
        {
            "id":10450,
            "instances":[1]
        }
    ]
}
For each file, the instance ids of the added Attribute records are returned.
Updating Attribute Values
The following example updates the Note of the Attribute record with the instance id 1 to a new value. Use this as a template for your own Attribute update operations.
var task = {
    // We update an existing record
    op : 'update',
    // The instance id(s) of the Attribute record to update. Use an empty array to update all instances.
    // The instance id is returned when you request Attribute data (see above).
    instanceid: [1],
    data : {
        'Note' : 'This value has been updated.'
    }
}
var tasks = [];
 tasks.push(task);

var params = {
    // We update the Notes set
    set: 'Notes',
    // For all selected files
    idlist: IMatch.idlist.fileWindowSelection,
    tasks: JSON.stringify(tasks)
}

IMWS.post('v1/attributes',params).then(function(response) {
    console.log(JSON.stringify(response,null,2));
},
function(error){
    console.log(JSON.stringify(error,null,2));
});
Deleting Attribute Records
The following code fragment deletes the Attribute record with the instance id 1 for the focused file. To delete all instances, provide an empty instanceid array.
var task = {
    op : 'delete',
    instanceid: [1]
}
var tasks = [];
tasks.push(task);

// Prepare the parameters to send to IMatch
var params = {
    set: 'Notes',
    idlist: IMatch.idlist.fileWindowFocusedFile,
    tasks: JSON.stringify(task)
}

IMWS.post('v1/attributes',params).then(function(response) {
    console.log(JSON.stringify(response,null,2));
},
function(error){
    console.log(JSON.stringify(error,null,2));
});
You can delete multiple instances by specifying multiple instance ids. And for multiple files at once. Attempts to delete non-existing instances are ignored and not an error.
Modifying the Attribute Schema
IMWS provides endpoints to create, modify and delete Attribute Sets and Attributes.
Creating Attribute Sets
The endpoint /attributes/schema/set/create is used to create new global and per-file Attribute Sets.
| Parameter | Description |
|---|---|
name | The name of the new Attribute Set. Use a unique, non-empty name consisting of letters and digits. The following characters are not allowed: ' " @ \ | . , : ; { } ~ # & $ € < >."
|
type | Either global (global set) or file (per-file set). |
description | An optional description. |
attributes | An optional array with attribute objects. You can use this to create a Set and Attributes at the same time.
For more information see Creating Attributes. |
Modifying Attribute Sets
The endpoint /attributes/schema/set/update can be used to change the name or description of Attribute Sets.
| Parameter | Description |
|---|---|
setid | The id of the set to modify. Use either this or set. |
set | The name of the set to modify. |
name | Optional. The new name of the new Attribute Set. Use a unique, non-empty name consisting of letters and digits. The following characters are not allowed: ' " @ \ | . , : ; { } ~ # & $ € < >."
|
description | Optional. The new description for the Attribute Set. |
Deleting Attribute Sets
Warning: This endpoint deletes the Attribute Set, all contained Attributes and data.
The endpoint /attributes/schema/set/delete is used with a DELETE request to delete global or per-file Attribute Sets.
| Parameter | Description |
|---|---|
setid | The id of the Set to delete. Use either this or set. |
set | The name of the Set to delete. |
Creating Attributes
The endpoint /attributes/schema/attribute/create is used to create one or more Attributes in existing Sets.
| Parameter | Description | ||||||||||||||||||||||||
|---|---|---|---|---|---|---|---|---|---|---|---|---|---|---|---|---|---|---|---|---|---|---|---|---|---|
setid | The id of the Attribute Set to add this Attribute to. Use either this is set. | ||||||||||||||||||||||||
set | The name of the Attribute Set to add this Attribute to. | ||||||||||||||||||||||||
name | The name of the new Attribute. Use a unique, non-empty name consisting of letters and digits. The following characters are not allowed: ' " @ \ | . , : ; { } ~ # & $ € < >."
| ||||||||||||||||||||||||
attributes | Array of attribute objects which describe the attributes to add. Each object has the following elements:
Example |
Modifying Attributes
The endpoint /attributes/schema/attribute/update can be used to change one or more Attribute options.
| Parameter | Description |
|---|---|
id | The id of the Attribute to update. Use either this or path. |
path | The Attribute path in the format Set.Attribute, e.g., 'Customer.Name'. |
attribute | This object describes the options to change. It has the same format as the attribute object used to create attributes. Note: You cannot change the attribute type. |
Deleting Attributes
Warning: This endpoint deletes the Attribute and all data stored for this Attribute.
The endpoint /attributes/schema/attribute is used with a DELETE request to delete Attribute and associated data.
| Parameter | Description |
|---|---|
id | The id of the Attribute to delete. Use either this or path. |
path | The Attribute path in the format Set.Attribute, e.g., 'Customer.Name'. |
Examples
Creating a New Attribute Set
The following code fragment createa a new Attriute Set with two Attributes:
// The Attributes we want to add
const attributes = [
    {
        name: 'Code',
        type: 'int'
    },
    {
        name: 'Note',
        type: 'string'
    }
]

IMWS.post('v1/attributes/schema/set/create',{
    // The name of the new set
    name: 'My Set',
    description: 'This set contains data.',
    // The type (we create a per-file set)
    type: 'file',
    // We also add a few attributes when we create the set
    attributes: JSON.stringify(attributes)
}).then(function(response) {
    console.log(JSON.stringify(response,null,2));
},function(error) {
    console.log(JSON.stringify(error,null,2));
});
Adding Attributes to a Set
// The attributes to add
const newAttributes = [
    {
        name: 'Date',
        type: 'date'
    },
    {
        name: 'Email',
        type: 'hyperlink'
    }
]

IMWS.post('v1/attributes/schema/attribute/create',{
    set: 'My Set',
    attributes: JSON.stringify(newAttributes)
}).then(function(response) {
    console.log(JSON.stringify(response,null,2));
},function(error) {
    console.log(JSON.stringify(error,null,2));
});
Removing Attributes from a Set
The following code deletes the Attribute named Email from the Attribute Set My Set:
IMWS.delete('v1/attributes/schema/attribute',{
    path: 'My Set.Email'
}).then(function(response) {
    console.log(JSON.stringify(response,null,2));
},function(error) {
    console.log(JSON.stringify(error,null,2));
});
Removing an Attribute Set
To delete the Attribute Set My Set created above, use this code:
IMWS.delete('v1/attributes/schema/set',{
    set: 'My Set'
}).then(function(response) {
    console.log(JSON.stringify(response,null,2));
},function(error) {
    console.log(JSON.stringify(error,null,2));
});